Also on the Animations tab, in the Animation group, click the Effect Options dialog box launcher. ... the Format tab, in the bottom right corner of the Size group, click the Size and Position dialog box launcher ... the Format tab, in the bottom right corner of the Size group, click the Size and Position dialog box launcher
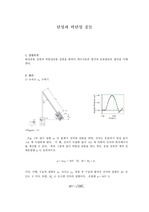
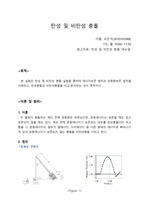
Secondary, we installed the launcher above an angle, theta. ... 실험방법 Ex1: Projectile Motion We installed the launcher horizontally. ... Ex4: Projectile Path We installed the launcher horizontally on the table.
We guessed rough distance when the reaching point and launcher were on the same height. ... experiment2) Projectile Motion Using Photogates We installed the Photogate devices on the outside of the launcher ... checked it with the real experimental data. experiment3) Projectile Range Verses Angle We had set up the launcher
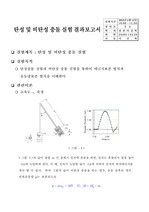
Launcher 의 세기를 2단으로 맞춘다. ? 진자의 방향을 세팅하고 launcher 의 공을 발사시켜 각도 를 측정한다. ? 측정된 각도 를 표에 기록한다 ? ... 론처(Launcher)의 세기를 2단으로 맞춘다. ? 진자의 방향을 세팅하고 론처(launcher)의 공을 발사시켜 각도 를 측정한다. ? 측정된 각도 를 표에 기록한다 ? ... 오차값 최소화를 위한 조치사항 · 론처((launcher)발사시 일정한 힘을 가하기 위해 론처론처((launcher)담당 인원 지정(하재현) 및 발사줄 90°유지후 발사 실시 · 진자의
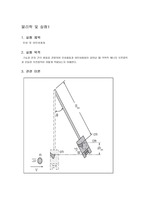
Set up ① We clamped the Projectile Launcher to a sturdy chair near one end of the chair with the launcher ... the photogate bracket to the launcher and at tached two photogates to the bracket. ... Set up ① We clamped the Projectile Launcher to a sturdy chair near one end of the chair. ② We adjusted
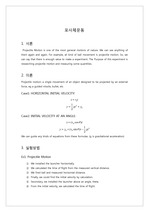
preliminary experiment – measurement of the velocity of the Projectile Launcher for different angles ... preliminary experiment – measurement of the velocity of the Projectile Launcher for different angles ... experiment A1 – measurement with a Tcus of the parabolic motion with a Projectile Launcher and a sheet
실험 방법 실험 1 : 회로 구성요소 값 측정 NI ELVIS Instrument Launcher를 작동시키고 Digital Multimeter를 선택한다. ... NI ELVIS Instrument Launcher 에서 Function Generator를 선택한다. 3. RC회로의 전압신호를 분석하기 위해 오실로스코프를 사용해보자. ... NI ELVIS Instrument Launcher에서 Oscilloscope를 선택한다. 4.채널A와 채널 B에 Source 소스를 세팅하고 TRIGGER 와 TIME BASE inputs
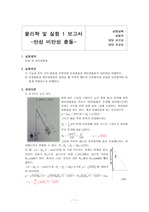
실험방법 1) 초속도 측정 (1) 진자의 아래쪽에 달려있는 추를 완전히 제거한다. (2) 진자의 Rotary Motion Sensor 를 0도에 맞춘다. (3) Launcher 의 ... 세기를 2단으로 맞춘다. (4) Fig. 1 과 같이 진자의 방향을 세팅하고 launcher 의 공을 발사시켜 각도 를 측정한다. (5) 측정된 각도 를 표에 기록한다 (6) (2) ... 의 세기를 2단으로 맞춘다. (4) Fig. 2와 같이 진자의 방향을 세팅하고 launcher 의 공을 발사시켜 각도 를 측정한다. (5) 측정된 각도 를 표에 기록한다 (6) (
의 세기를 2단으로 맞춘다. 4) [그림 II-5-1]과 같이 진자의 방향을 세팅하고 launcher 의 공을 발사시켜 각도 θ를 측정한다. 5) 측정된 각도 θ를 표에 기록한다 ... 의 세기를 2단으로 맞춘다. 4) [그림 II-5-3]과 같이 진자의 방향을 세팅하고 launcher 의 공을 발사시켜 각도 θ를 측정한다. 5) 측정된 각도 θ를 표에 기록한다 ... 에서 4)의 과정을 반복한다. (3) 완전탄성충돌 1) 진자의 아래쪽에 달려있는 추를 완전히 제거한다. 2) 진자의 Rotary Motion Sensor 를 0도에 맞춘다. 3) Launcher
Launcher 의 세기를 2단으로 맞춘다. Fig .1과 같이 진자의 방향을 조절하고 launcher의 공을 발사시켜 각도 θ를 측정한다. ... Launcher 의 세기를 2단으로 맞춘다. Fig.2와 같이 진자의 방향을 조절하고 launcher 의 공을 발사시켜 각도 θ를 측정한다.
에 맞춘다. 2) Launcher의 세기를 2단으로 맞추고 방향 세팅(bumper side가 발사대 앞에 오도록 설치) 후 공을 발사시켜 θ를 측정한다. 3) 위 실험을 5번 반복하고 ... 에 맞춘다. 2) Launcher의 세기를 2단으로 맞추고 방향 세팅(catcher side가 발사대 앞에 오도록 설치) 후 공을 발사시켜 θ를 측정한다. 3) 위 실험을 5번 반복하고
실험방법 1) 초속도 측정 (1) 진자의 아래쪽에 달려있는 추를 완전히 제거한다. (2) 진자의 Rotary Motion Sensor 를 0도에 맞춘다. (3) Launcher 의 ... 세기를 2단으로 맞춘다. (4) Fig. 1 과 같이 진자의 방향을 세팅하고 launcher 의 공을 발사시켜 각도 를 측정한다. (5) 측정된 각도 를 표에 기록한다 (6) (2) ... 의 세기를 2단으로 맞춘다. (4) Fig. 2와 같이 진자의 방향을 세팅하고 launcher 의 공을 발사시켜 각도 를 측정한다. (5) 측정된 각도 를 표에 기록한다 (6) (
, 구슬을 Launcher에 넣을 때 몇 단으로 넣느냐 도 실험결과에 영향을 미치게 되고, Launcher에서 플레이트까지 거리를 측정하는 과정에서 정확하게 측정이 안 되었을 가능성도 ... 그 이유를 생각해보니 Launcher를 발사하면서 공기와 같은 외부의 요인가 작용했을 가능성도 있고, 바닥과 수평이 정확이 이루어졌는가하는 실험준비상의 오류가 존재했을 것이라고 생각되고
(straight up). ③ We put the steel ball into the Projectile Launcher and cocked it to the long range ... We plugged the photogates into a computer. ② We adjusted the angle of the Projectile Launcher to 90 degrees ... three times and took the average of these timeoved the angle indicator to zero degrees. ② We fired the launcher
Launcher의 스프링을 당겨 공을 장전한다. ... Materials&Methods -materials- Projectile motion launcher, Plastic ball(1), Clamp, I-CA system -precedure ... 공의 발사 강도는 1~3까지의 세 단계가 있으나 3단계는 너무 강하므로 1, 2단계로만 실험한다. 4) I-CA 프로그램을 사용하여 스크린을 촬영한다. 5) Projectile Launcher를